Tuesday, November 05, 2013

very vanilla eggless cupcake

 
o-kaaaayyy...before anyone says anything about the frosting...lemme just tell you that I am not too happy at how it turned out to be...both on the cupcake and also the color. on the cupcake, swirled like that...it looked... *sigh* like...something...that...should...not...be...on a cupcake. hahahahaha!! forgive me and my limited frosting abilities. hahahahaha!!
 
good thing about this cupcake is that...it is SO tasty that i will be baking these again for class on Saturday. but this time, i will frost it with vanilla frosting...or...maybe tint it a bit...maybe.  well, what happened was, I made these yesterday and...yesterday I got a watsapp informing me that there would be no class today (Tuesday)...so i was left with 30 odd cupcakes. what's a girl to do? I did what any girl would do. i distributed them all over the place. haaaa... macam pandai je.
 
but, worry not, come saturday i will be bringing these for class...only with a different frosting so that it will not look as weird as the one on top. hehehahaha!!
 
i googled for an eggless recipe and found this one here.   it looked simple enough so i decided to give it a go. and true to the blog, these turned out wonderful!! not only was it easy to prepare and bake...it is delicious! this could very well be my go-to recipe when I need something simple and yet delicious to bake.
 
okay, as usual, I have converted all the ingredients into metric measurement but should you want to use the imperial measurement, please click here.
 
ready? let's go!!!
 
you will need:
219g all purpose flour
225g sugar
1 tsp baking powder
1 tsp baking soda

½ tsp salt
1 cup milk*
½ cup canola oil
2 tbsp vanilla
1 tbsp apple cider vinegar

for the vanilla frosting:
114g butter
188g icing sugar
½ tsp vanilla
1-3 tbsp milk*

I used the chocolate frosting that I googled and led me here.

*and again, I didn't go all vegan with this, I only went eggless, but if you want to go all vegan, go on over here.

the how to:
for the cupcakes,
1)  preheat the oven to 175°C, and line your pan with cupcake liners.

2)  in a bowl whisk together all the dry ingredients. I just used a fork to fork it. :-p

3)  in another bowl, whisk together all the wet ingredients. okay, for this one, I had to use a whisk.

4)  pour the wet ingredients into the dry and whisk till just combined.
do.
not.
over mix. capische??? (tiba2 jadi gangster pulak)

5)  fill your cupcake liners and bake for 8-10 minutes.

for the vanilla frosting:
1)  using your mixer, beat the butter till light and fluffy

2)  reduce speed and slowly add your icing sugar (slowwwly...unless if you want to be powdered with sugar... :-p) vanilla, and the milk, one tablespoon at a time until the frosting reaches the consistency that you want.

3)  beat on high for about 2 minutes, till the frosting is really fluffy.**

**I will give this a go for Saturday's cuppies. tulah..sapa suruh pandai-pandai sangat cari kat tempat lain.

for me, the cupcake is super fantastic, super moist and most importantly, super easy to make and bake. I will definitely bake these again.

as for the frosting, the chocolate frosting that I used...I didn't particularly like how it turned out. the color was a bit off. I followed the instruction to a T...it says that sans liquid (in the form of milk) you should be able to beat the frosting till fluffy...but...what happened to mine was, without any form of liquid, except for that 1 tsp of vanilla, the whole mixture became almost flour-like. so, in the end, I ended up adding about 8 teaspoons of milk. :-( so...I don't think I will be attempting this frosting again. didn't like the texture, didn't like the color. sorry.

if you guys have your own favorite frosting, you guys can just go on ahead and use that. as for me, I will try the frosting that came with this recipe.

there. what a loooong entry.

I shall now leave you guys, to go and gather the ingredients for these really nice vanilla cupcakes. let me know how yours turned out to be okay?

luck luck!!

recipe for the cupcakes adapted from http://whippedbaking.com/ thank you!!
recipe for the chocolate frosting taken from http://www.averiecooks.com/ thank you!!


Thursday, October 31, 2013

yogurt chocolate chip cookies


it has been quite a long time since I last cookie-d anything. i haven't been cookie-ing for such a long time. hence the cookie-ness today. i can happily say that today, i cookie-d. hahahaha!! sorry...i have always wanted to do that. hahaha... so..i cookie-d.
 
okay okay okay...my hunt for eggless recipes continues. i bookmarked this recipe last week because i wanted to give it a go. it looked pretty interesting. replacing the egg with plain yogurt...I mean..who would've thought. and then also i was curious as to how these would taste. so, today, I decided to cookie this. haaaa...
 
ready for the recipe?
 
you will need:
110g brown sugar
100g white sugar
55g butter
50g shortening*
115g plain yogurt
2 tsps. vanilla extract
220g all purpose flour
½ tsp baking soda
½ tsp salt
335g semi sweet chocolate chips**

*I used all butter
** I used milk chocolate chips

the how to:
1)  pre heat oven at 190°C

2)  cream both sugars and butter til light and fluffy.

3)  next in goes the yogurt and vanilla extract.

4)  in a bowl combine the flour, baking soda and salt.

5)  incorporate the dry ingredients into the sugar + butter + yogurt + vanilla mixture just till combined.

6)  add in the chocolate chips.

7)  bake for 8-10 minutes.

 
i baked these...and...I love these...BUT, i would make a couple of changes to suit my personal taste. when I try out new recipes I usually follow the recipe exactly. so that as least I know how it will turn out to be and then decide on whether I need to make some changes or just stick to it.
 
so, adjustment number 1 is, I would reduce the amount of sugars used because the chocolate chips that I used are already sweet and they will contribute to the sweetness of these cookies.
 
adjustment number 2 would be, the baking time. I think I might want to increase the baking time to make these a bit more crunchier. texturewise, these cookies are a combination between soft and crunchy. while I LOVE soft cookies, unfortunately, not many Malaysian get the idea of soft cookies, most times, i would be asked if I had 'underbake' my cookies...or in their exact words 'biskut ni tak masak ke??' so...I would like to try to make these a tad crunchier.  tastewise, I like it. I like the tang from the plain yogurt, it gives you a different kind of taste than you normally would get from normal chocolate chip cookies.
 
there you go. really easy, really tasty. so...what are you waitin' for??? get cookie-ing!!!
 
thank you www.allrecipes.com for the recipe and if you want the imperial measurement for these cookies, you guys can go on over here.

Monday, October 28, 2013

eggless chocolate peanut butter oatmeal muffins

haaa...amek ko! what a mouthful to say...and eat.

I went online in search for another eggless recipe for class and found this. i actually follow madhuram's eggless cooking blog. so, naturally i wanted to give this recipe a go, especially

since i had everything at home for this. jadi, why not? kan?
 

before I go on, let me just say that i did not go all vegan for this recipe. i just followed the eggless bit of it. but if you guys are interested in going all vegan, you guys can click here.
 
okay, you guys ready for the recipe?
 
you will need:
110g (1 cup) all purpose flour
60g (⅔ cup) quick cooking oats
40g (⅓ cup) cocoa powder
170g (¾ cup) sugar
1 tbsp baking powder
130g (½ cup) peanut butter*

*i used crunchy peanut butter, because that was all i had. :-p

the how to:
1)  preheat the oven to 200°C.

2)  in a small saucepan, over low heat, melt the peanut butter in milk. stir constantly.  once the peanut butter has melted, take the pan off the heat and set aside to cool.

3)  while waiting for peanut butter mixture to cool, line your muffin tin with liners.

4)  in a large bowl, combine all the dry ingredients of flour, oats, cocoa powder, sugar and baking powder.

5)  once the peanut butter mixture is cool, combine the mixture with the dry ingredients and stir til just combined.

6)  spoon the batter into the muffin tin. **

7)  bake for 10-15 minutes, depending on your oven temperature.

** i used a 5cm (2") ice cream scoop and got 16 muffins.


taste wise, these muffins have a really balanced taste. it wasn't too sweet neither was it bland.  one thing i need to tell you guys that these muffins had a bit of a bite to them. mrG told me they were chewy...maybe because of the quick cooking oats. 
 
if you guys are looking for a more 'adult' kind of muffins, then this is the recipe for you.
 
luck luck!!
 
 
recipe adapted from: madhuram's eggless cooking website. thank you!! 


Saturday, October 12, 2013

vegan red velvet cupcake


never in a million years would I thought i'd bake anything vegan. or eggless. never. but, as the famous saying goes, never say never. and today I am making a promise to myself, that I will never say never...well, okay...i'll say never to a few thingslah...but, I am open to suggestions.
 
a classmate of mine is allergic to eggs. how insensitive of me to not notice that each week, when I bring something to class, when the container of baked goods is being passed from one person to another, she would pass the container to the next person without taking anything. lucky for me, she told me about this last week, so...I promised her i'll bake her something without eggs.
 
I went online and found this recipe.  you know what? I think i'm on a lucky streak. why? well, this is yet another recipe that does NOT require the use of theGiant. except for the frosting though. so, this is a very easy and straightforward recipe as well. my kind of recipe. you know...the kind that requires you to combine the wet and the dry and voila! it's done!
 
tastewise, well, I was pleasantly surprised that these taste exactly like the normal red velvet cupcakes. only difference is the texture is not as soft as I would've wanted it to be and the color is more on the brownish side...I might want to make certain changes with the amount of red food color I use and also on the baking time and see what happens. first try maaahhh...
 
so, you wanna give this a go?
 
let's go!!
 
you will need:
200ml soya milk
20ml cider vinegar
200g self-raising flour
200g caster sugar
20g cocoa powder 
¼tsp salt
¼tsp bicarbonate of soda
¼tsp baking powder
80ml light rapeseed or other flavorless oil
1tbsp vanilla extract or essence
½-1 tsp red food coloring paste (not liquid)*

for the frosting:**
25g dairy free margarine
75g vegetable shortening
125g soya cream cheese
1tbsp vanilla extract
750g icing sugar (giler banyakkk!!!)
¼tsp salt
about 30-40 soya or rice milk
red sweets (decoration kot?) ini optional.

the how to:
1)  preheat oven to 180°C/350°F/Gas Mark 4

2)  line muffin tray with cupcake liners

3)  mix the soya milk with the cider vinegar and set aside for 10 minutes

4)  get a bowl and it in place the sugar, flour, cocoa powder, salt baking soda and baking powder. mix until combined.

5)  add the soya milk mixture, oil, vanilla and the red food coloring into the dry ingredients. using a metal spoon (I don't know why this is a requirement...) and quickly mix all these until they are just combined and the batter is still a bit lumpy.  tap the bowl of this mixture on your counter to stop the raising agents from working too quickly. observe some bubble popping action. I did. not too many, but gotlah. :-p

6)  spoon the batter into your muffin cups. (I used my every so faithful ice cream scoop) and then...tap the tray on your counter again...to witness more  fireworks   bubble popping action.

7)  bake for 15 minutes. (my oven only required about 8 minutes...yours?) let the cupcakes sit in the tray to cool and chill for about 10 minutes before transferring them on the cooling rack.

frosting:

1)  with an electric or hand-held mixer, whip together the margarine, vegetable fat, cream cheese and vanilla and they are creamy.

2)  add half of the icing sugar and 30ml (2tbsp) milk and continue mixing while gradually increasing the speed until all is combined.

3)  add the rest of the icing sugar until you get a smooth consistency.

4)  if the icing is too firm, you can add a bit more milk and if it's too soft, you add icing sugar lorrr...

*since I don't have any kind of food coloring paste I used liquid
** I didn't use this version of the frosting because...where the hell can I find soya cream cheese in puchong??? anyone?

All in all, I will definitely be baking these again and again and again, this recipe is a keeper!!!

what about you guys? trylah...ishhhh! :-p


thank you:
http://www.suma.coop for this wonderful recipe.
 

Tuesday, October 08, 2013

donna hay's milk chocolate chunk muffins


so... I made muffins.
 
i bought this book, Simple Essentials Chocolate by Donna Hay, quite some time ago. when i first got the book i tried this recipe. then...i sorta like *ehem* misplaced the book and sorta like *ehem* forgotten that i even had the book. haha.
 
anyhoo...long story short, i found the book and since i had all the ingredients aaaaaand this is yet another NON-mixer recipe, i decided to give this a go...you know, for class.
 
my take on this muffin is that, if you are a chocolate lover and you don't like your muffins to be on the sweet side, then, this is THE recipe for you. BUT you need to really use good quality cocoa powder and milk chocolate chunk to get the most out of this recipe. i personally like it because the texture is a bit densed, unlike normal muffins...and it has this rich chocolatey flavor minus the sweetness of sugar. this is a winner, for me lah.
 
if you want to know, you trylah... you try, okay? okay!
 
ready for the recipe?


you will need: *
2 cups (300g/10½ oz) self-raising flour, sifted 
⅓ cup (40g) cocoa powder, sifted
1 tsp baking powder
1 cup (220g/7¾ oz)caster sugar
2 eggs
1 tsp vanilla extract
cup (160ml) vegetable oil
½ cup (125ml) mil
1 cup chopped milk chocolate **

*i don't know lah this donna hay...i don't know if she uses the US cup measurement or the OZ measurement cup...but bila I tried to convert it is not the same as the metric measurement given in her book. Pening mak temah...what I did was for the flour I used 250g of flour. because when I baked the first batch, the batter was a bit too sticky and thick.

**I chopped up about 200g of milk chocolate.

the how to:
1)  preheat oven to 180°C (350°F)

2)  in a bowl, place the flour, cocoa, baking powder and sugar. mix to combine.

3)  in another bowl, combine the eggs, vanilla, oil and milk. whisk these together.

4)  stir the egg mixture into the flour mixture until just combined.

5)  fold in the chocolate chunks and spoon the mixture into your muffin liners.

6)  bake for 20-25 minutes.


this is a pretty simple and straightforward recipe. no rocket science required. so...I hope you guys will give this a go. kalau tak...rugiiii...sedap wohhhh.

luck luck...and be sure to come back okay?

thanks to:
1)  www.goodreads.com for the book cover image
2)  donna hay's Simple Essentials - Chocolate book for the recipe.


Friday, September 20, 2013

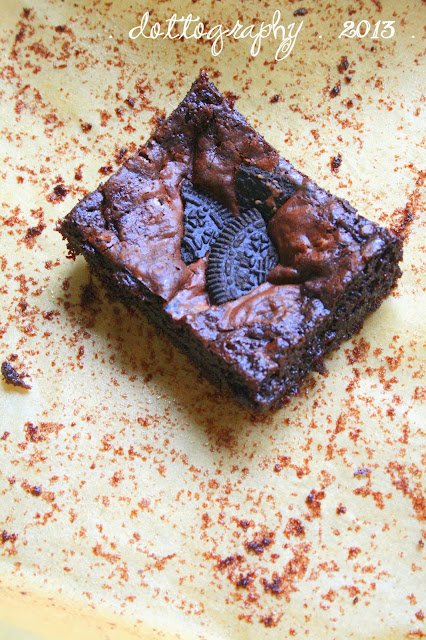
oreo brownies


OMG! OMG! OMG! OMG! OMG!!!!! this recipe is a keeper.
 
i
kid
you
not!
 
you wanna know why? because it is MY kind of recipe. easy to prepare, easy to make. yummy to the tummy...okay, maaayyyybe yummy to the tummy doesn't sound quite right, but...nevertheless...that's what i think this pan of goodness is.


early this morning, i was looking for a recipe that is easy enough for me to bake. because i want to bring some to the class tomorrow. you know, my goal, is to make everyone fat  err..i mean "healthy" by the end of the semester. ngeeee.... hehehahaha!! so i came across this recipe from www.theidearoom.net/
 
i wasn't too convinced because...come on, how can something SO easy to make be SO yummy, right? i decided to give it a go...and true enough. i was not disappointed. i took a slice, still warm from the pan...(i mean, who WAITS for their brownies to cool anyway? right???) and it was gone within seconds.  i gave some to a friend and made a second batch for class tomorrow.
 
 
okay...is everybody already at the edge of their seats waiting for the recipe? huh? huh? huh? yes??? no???... malu nak mengakulah tu! okay, let's go!!
 
you will need:
½ cup (125ml) vegetable oil
1 cup (200g) sugar
1 tsp vanilla
2 large eggs
¼ teaspoon baking powder
cup (40g) cocoa powder 
¼ tsp salt
½ cup (64g) flour
aaaaandddd...the star of this recipe 15-20 oreos crushed.*

the how to:
1)  preheat the oven to 170°C

2)  mix oil and sugar til well blended.

3)  in goes the eggs and vanilla, stir until just blended.

4)  in another bowl, mix all of the dry ingredients.

5)  stir in the dry ingredients into the wet ingredients.

6)  crush the oreos and stir in ¾  of them into the mixture.

7)  pour batter into a greased 9x9 square pan. i just lined mine with parchment paper.

8)  sprinkle the remaining broken oreo bits over the top of the brownie batter.

9)  bake for 20 minutes or until the sides start to pull away from the pan.

10) cool completely before devouring them straight from the pan  cutting them. :-p

*okay, i know the recipe calls for 15-20 oreo cookies. i only used 14. they were just nice...okay, okay...that was NOT the reason why. the reason why is, there are only 14 oreo cookies in the standard Malaysian pack. so... i was not game on opening another pack of oreos just to get that other one oreo cookie. okay tak? okaylah tu! hehehe...


what i think about these brownies? i LOVE them. they are not too sweet and they are chewy and they make me happy because they are easy to make and i love them and i will make them again because i love them....have i told you how much i love these?? well, i'll tell you one more time. i love these brownies!! love love love love love!!! there.

go on now, you know you wanna rush out to get yourselves a pack of oreos. go on. and be sure to let me know how yours turn out, okay?

come back now! :-)


thank you www.theidearoom.net for this wonderful recipe.


Wednesday, September 18, 2013

Blondies


so, I made blondies. or congo bars. I've seen these being baked by bloggers all around...but they seem to prefer the name congo bars...instead of blondies. I guess maybe because like me, the only other blondie that I know of is this one particular talented lady. tulah pasal agaknya.
 
so...in order to see what the hoopla is all about about these congo bars/blondies, I decided to bake them. because seriously...that's what I've been hearing, day in...day out. congo bars here...congo bars there...congo bars everywhere. oh, and I also bought this oh! so wonderful brownie pan thingamajig. :-) what better way than to break the pan in with this recipe, right?
 
okay, I went around looking for an easy recipe, well, if you know me, you know I want to make it as easy as possible. and found a recipe from www.bakerella.com. and i had almost all the ingredients. so, the rest is history.
 
 
the recipe is pretty straightforward and easy enough. and i have taken the liberty...because, i am such a nice person, to convert everything into metric measurements. but for those of you who would like to use the imperial measurement, please feel free to click here.
 
okay, ready for the recipe now?
 
you will need:
305g all purpose flour
2½ tsp baking powder 
½ tsp salt
150g butter, softened
454g brown sugar (yupppp...you read right)
3 eggs
1 tsp vanilla
326g choco chips (i used a combo of dark, milk and white chocolate chips)
170g pecan (optional, i didn't have any, so...)

the how to:*
1)  preheat your oven to 170°C

2)  i placed the flour, baking powder and salt in a bowl and used a fork to sort of 'whisk' them.

3)  in my mixer i combined the butter and sugar till blended.

4)  then in goes the eggs, one at a time. mixer speed on low.

5)  add in the vanilla.

6)  add in the flour mixture till they are all combined.

7)  last but not least, stir in the chocolate chips and pecans.

8)  bake for 30 minutes or so, depending on your oven. you know your oven, so please adjust accordingly. **

9)  i used a 9" x 9" brownie pan.

*www.bakerella.com has two preparation options, you either prepare the mixture by hand or mixer. i decided on using my mixer.

** i baked mine for a bit longer than the specified 30minutes.


 tastewise, to me, it was a tad too sweet. i would adjust the amount of sugar the next time i bake these. but, MrG seems to like them. i mean, he finished 3 slices in one go! so i guess that says a lot, huh? all in all, this recipe is a keeper. in fact, i will be baking these to bring to my class on Saturday. yeay!!!

please give this recipe a go...you will NOT regret it.

and yes, i remember, i still owe you guys one baking flop story, but...this is too good of a recipe to delay posting. hahhahahahahaa...alasaannn.

go on now! bake on!!

thank you:
1)  youtube.com and emimusic for the video clip.
2)  bakerella for the wonderful recipe.
3)  Chicago metallic for the photo of the brownie pan.
 

Wednesday, July 31, 2013

i'm an uncle!!!


everyone, meet caliph aqeef. he arrived yesterday. I am now an uncle.
 
my darling caliph aqeef, welcome to the world. we'll have so much fun together doing non-girly things. but, I don't do bugs, okay?


photos stolen from caliph's mommy's FB site. hihihi. thanks hor. 

Tuesday, July 30, 2013

thin and crispy oatmeal cookies

well, hello there...
 
lama giler tak update blog, tetiba je terus thin and crispy oatmeal cookies. sabar ye anak-anak, mak temah nak make a comeback ler ni. (macam celeb uol, nak comeback-comeback bagai).
 
wait! before that, I think it's still not too late for me to wish everyone Ramadhan Kareem. I know, I know, we are at the last few days of ramadhan, like everyone else, I too wish that it would stay. but, that's not how things work around here. my only wish is that the Almighty will grant me another Ramadhan next year. InsyaAllah, amin.
 
it is already end of july, and I only have like 5 blog entries to my name, for 2013 that is.
 
shame.
on.
me.
 
I will try to improve hoccay? although it's already towards the end of the year, and I am sounding like a repeat of a new year's resolution, I think it's still okay for me to TRY to improve on the regularity of my blog entries.

so, how much have you missed me?? show of hands? anyone? yes? no one? like, seriously? no one?? *sigh* takpelah camtu.


okay, like I mentioned in the first paragraph I am making a comeback and what better way to make a comeback then post about my recent bakes. yessss...you are reading this right. bakeS...as in plural and in more than one...as in, okaylah two. hey! two IS more than one, so that counts as a plural santing-santing. I would like to start with these cookies, because the other attempt was a flop and who would want to make a comeback with a flop story, right?

two weeks ago my friend tini posted a picture of these cookies on FB. and since I love oats and anything and everything that has got something or anything and everything to do with them, I asked her for the recipe. she told me she got it from here. Mel's Kitchen Café. so today, i suddenly had the urge to give this recipe a try.

i have taken the liberty in converting the ingredients into metric measurement, but if you guys want the imperial measurement, then you guy can click here.

ready?

let's go!!

you will need:
140g of all purpose flour
¾ tsp baking powder
½ tsp baking soda
½ tsp salt
198.46g* butter :-p
225g granulated sugar
50g light brown sugar
1 large egg
1 tsp vanilla essence
225g rolled oats. (i used large leaf german rolled oats...my my now THAT was a mouthful)

the how to:
1)  as always please pre-heat your oven to 175°C.**

2)  combine and whisk the flour, baking powder, baking soda and salt in a bowl.

3)  using your mixer, beat the butter and both sugars till combined at a low speed, after which you go all craycray with a medium speed until they are light and fluffy.

4)  then, in goes the egg and vanilla essence, beat on medium low speed until they are mixed.

5)  next, you add in the flour mixture and mixed just so-so, barely incorporated, kata dak Mel tu. she also says that it's okay if there are a few dry spots.

6)  once done, gradually add in the oats until well mixed.

7)  scoop the dough out into your baking sheet (now, at this point of time, i don't think i need to inform you guys to line your baking sheet already, right? come onnn...you guys are experts at this...i bet you're going back into the kitchen to line them baking sheets, right? haha)...okay, okay, back to the dough in question. for this, i used my 3cm ice cream scoop.***

8)  bake until the cookies are golden brown, edges are crisp but the centers are still slightly soft. in my case, i baked the cookies for about 10 minutes.

siap!!

*seriously? you are actually coming down here to see what the asterix is about? i mean, like seriously? who would want to measure out 198.46g of butter? who??? so, why don't we just do the right thing and measure it to 200g, right? but, seriously? i can't believe you guys are even reading this. seriously?

**this temp was a direct conversion from the original recipe. in my case, i had to tone the heat down a tad, because the cookies were flattening and burning by the end of the 5th minute. so, i adjusted my heat to be 150°C

***if you use a 3cm ice cream scoop, you will get a cookie with the diameter between 6-7cm.

tastewise, if you like your cookies to be on the sweet side, then this is it. if not, you can always adjust the amount of sugar. i like the texture, because i made mine slightly soft in the center with the edges all crispy. there were also a few that were totally crispy all over, and those were fantastic as well.

 
well, what are you waiting for? go ahead! you know you want to give this recipe a go, right? awww come on, this is not the time or place to be shy. just get the ingredients out and whip yourself a batch, i promise you, you wont be disappointed. they are super easy to make and super easy to gobble up! haha.
 
luck luck!!
 
recipe source: www.melskitchencafe.com thank you!!
and my thanks to tini for sharing the recipe. :-)


Saturday, January 26, 2013

madeira cake


madeira cake. why did i bake this cake? and what is the madeira that this cake is talking about? what?? why??? *hihihi*
 
well, according to the book from where i got the recipe from, this cake is traditionally served with a glass of madeira wine in the nineteenth century. so, there is nothing madeira IN the cake. it is madeira because of the accompaniment of it. am i makin' any sense? *when have i ever made any sense??* HAHA!!
 
why did i bake this cake? well, first off, i had lemons in the fridge and i was itching to bake something that is really easy with really basic ingredients. so, there. plus, mrG was studying for his base check and i wanted to make a little santing2 for him to eat while studying. *baiknyaaaa tetiba...*
 
 
the cake itself, once out of the oven and after having it cooled in the tin for about 10 minutes or so, has the texture and softness of a japanese cheesecake. heck, i broke the dayum loaf in half while trying ton transfer the cake onto the cutting board...but, with some magic, hehehe....it somehow did not show in all of my photos. ngeeeeeeee...
 
taste wise, sans the madeira, it's just like a softer version of a lemon pound cake. and...i missed the last step of the recipe. prior to baking the cake, i was supposed to sprinkle the top of the cake batter with 1-2 tablespoons of sugar, but i forgot. i don't know if it makes any difference...but if anyone gives this a go and do sprinkle the top with sugar, please share okay? okay!
 
ready for the recipe?
 
let's go!!
 
you will need:
220g (8 oz) butter, at room temperature
140g (5 oz) caster sugar, plus 1-2 tbsp for sprinkling
3 large eggs
170g (6 oz) cups self-raising flour
30g (1 oz) plain flour
finely grated zest and juice of 1 lemon
 
the how to:
1)  preheat oven to 160°C (325°F/Gas mark 3).

2)  grease a 22 x 12cm (8½ x 4½ in) loaf tin, and line the bottom with greaseproof paper.

3)  beat together the butter and sugar until pale and creamy, then beat in the eggs one at a time.

4)  sift the flour over the mixture, then fold it in.

5)  fold in the lemon zest and juice.

6)  spoon the batter into the prepared tin, smoothing the top with the back of the spoon.

7)  sprinkle the top with 1-2 tablespoons of sugar (!!!!)

8)  bake for about 55 minutes or until a skewer inserted in the centre comes out clean

9)  leave the cake to cool in the tin for about 10 minutes before turning it out onto a wire rack to cool completely.


i like this cake because of its simplicity. the taste is just direct to the point (if you can call it that) and there's nothing complicated about it. better with a cuppa joe to go along with this cake. so...why don't you guys give it a go...and in the meantime, i'll cut myself a(nother) slice and enjoy it with my cup of kwafi.

have a wonderful weekend folks!!

recipe source:  500 cakes by susannah blake


Wednesday, January 09, 2013

banana cranberry loaf


what do you do when you have like 1kg of cranberries in the fridge, waiting...wailing...crying...begging...(okay, okay...a little too much of drama)..to be used? what do you do? huh? huh? huh? what? what??? (more drama???)
 
well, what you do is, you take 'em out of the fridge and then send them to the naughty corner  bake something!!
 
i made the banana cranberry loaf yesterday and by the end of the day, i was left with only 3 slices. Now, now....before you start to roll your eyes in disgust because maybe you thought i gobbled up the whole thing..think again. i did notlah! i shared. really. honestly. we had a get together with mr.G's family yesterday and i brought some. before that, mr.G came back from work and had some with tea and waaaaaaaayyyy before that, i might've had a slice or two...okay, okay...i had 2.5 slices of this. hey, you can't blame me. who can resist a loaf of anything warm and fresh out of the oven, right?


this is a pretty straightforward recipe. really easy. REALLY, REALLY easy. you know, combining the wet and the dry...bla bla bla...into the baking tin...okay, okay...maybe not that easylah. you need to chop the cranberries. aaaand also make some buttermilk first, because i don't have buttermilk all the time in the fridge. d-uh. who does? unless if you bake everyday...
 
so, apart from chopping the cranberries and making the buttermilk...everything else was easy. EASY. so? are you ready for the recipe? let's go!!
 
you will need:
75g (3 oz) unsalted butter, softened, plus extra for greasing
125g (4 oz) caster sugar
175g (6 oz) plain flour
25g (1 oz) wholewheat flour
½ tsp salt
2 tsp baking powder
¼ tsp bicarbonate of soda
3 medium size bananas (2 very ripe)
50ml (2fl.oz) buttermilk
2 large eggs, beaten
75g (3 oz) chopped dried cranberries

the how to:
1)  preheat oven to 175° C (350°F/gas mark 4).

2)  grease a 450g (1lb) loaf tin and dust with flour.

3)  beat the butter and sugar till creamy.

4)  combine all the dry ingredients.

5)  in another bowl, mash the 2 ripe bananas with the buttermilk.

6)  gradually add the beaten eggs gradually to the creamed butter and sugar.

7)  in goes the mashed bananas and the dry ingredients. mix lightly until combined. do not overmix.

8)  slice the third banana and add it to the batter with the cranberries, just stir til combined

9)  pour the batter into the loaf tin and bake for about 40 minutes, or until a toothpick inserted into the centre comes out clean

10) leave in the tin for 10 minutes, then turn out and cool on a wire rack.

taste wise this banana cranberry loaf is just so-so on the sweetness level, because you get the sweetness from the ripe bananas and also from the dried cranberries. the texture is more like densed cake. and, believe you me, it tastes REALLY good with a dollop of butter on it. especially while it's still warm...or, you can even toast the slice and then butter it.

i think it's perfect for tea...or even breakfast!

well? go on...go get your cranberries out of the fridge and start!!

luck luck!!

recipe taken from '500 Breakfast & Brunch Dishes' by Carol Beckerman.

Monday, January 07, 2013

scarf cap ibu dan anak


i knitted these for a friend and her wonderful daughter. they both make the perfect mother-daughter combo. best friends, they are inseparable. so, when i got the yarn, i immediately thought of them and started on this project.


for my friend, the mom, i chose this pattern called the falling water lace by bonnie sennott. i purposely did not block the scarf because i wanted the cable-like wavy thinggie to stand out aaaand..i kind like the part when the scarf curls up and it goes all tube-like...okay, maybe that's just me...but, if my friend wants...MAYBE she can block the scarf nanti-nanti. hehehe.... :-)
 
 
as for her cute little daughter, i used one of my favorite stitches theraspberry stitch. i got the tutorial from every one's favorite online anything-and-everything guru, Encik YouTube. terima kasih cikgu!!
 
 
well, everything's wrapped and packaged nicely just waiting to go on their journey. i hope they will both enjoy the scarves...and if ada senget2 somewhere and or anywhere...please forgive me horrr....i only beginner, but i will improve.
 
tata readers *ada readers kewwww???*
 
see you guys again soon-ish! :-)
 
thank you bonnie sennott for the beautiful lace pattern. i had fun knitting the scarf! :-)
thank you iknitwithcatfur for the very clear tutorial on raspberry stitch!